A few years ago I made my first tapestry. I learned a lot and enjoyed it, mostly: it's fun weaving the image but boring weaving the background. Lately, for the guild challenge "Country Garden" I wondered if I could weave a 3D robin. That way I could have the fun bit and dispense with the background!
My starting point was what I learned from making my sheep (all-in-one-piece sheep experiment). I made sketches of a robin in the local museum and found lots of web photos and a couple of Christmas cards. I made a series of graph paper models as I gradually refined the pattern.
As the idea came together I made a toile out of felt, colouring the pieces with watercolour pencils. I experimented with embedded bead eyes, a rolled up paper beak, and wire legs.
I jotted adjustments on the pattern.
Then I gathered my colours and wove a sample. From this I learned that it is not workable to use pin weaving to create such small curving shapes, so I decided to use holding stitches on a stiff background instead (this is a needle lace method). I figured out how to make the holes for the eyes and embed wire for stiffening the wings and tail.
The cartoon (weaving pattern) has the shape of the pieces, the marks for where pieces will join when they are sewn up, the positions of the warp threads, the colour areas, and the places where the colours will have sharp divisions (thin dark lines) or blend into each other (thick dark lines).
I began to attach the warp. I used lace-making tape around some edges because it is fine and stable. This will serve as a "seam allowance" and save me having to weave bulky extensions.
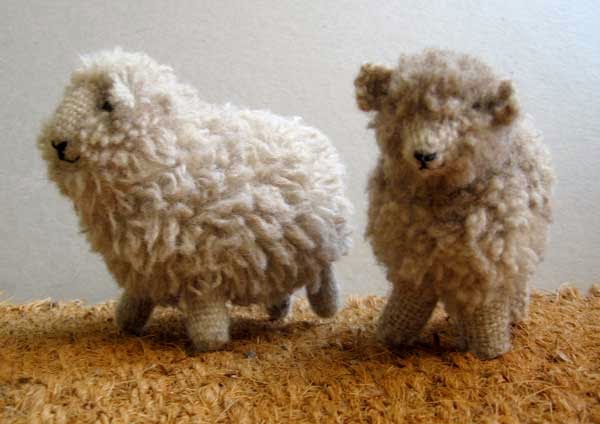
I scaled up the pattern and made two more sheep to use up all the off cuts from the jacket project. Each has her own personality.
I got an idea for using up the trimmings from my finished jacket. I could use the turkish carpet knot I've been waiting to try. So I made a little paper model of a ryeland sheep (That is the kind of wool I need to use up; better be authentic, right?).
Then I made a graph paper weaving pattern and pinned it ready for warping.
Warped it up.
Wove it. The head needed to woven first, then unpinned and pulled out of the way to make room to warp the front legs.
Took it off the loom.
Assembled it inside out.
Turned it right side out. Possibly I made the pile a bit too long?!
Sheared it.
Fulled it and brushed the fleece. Stuffed it and added ears and features. It's 7 cm (2.75 in) tall. Quite successful, but I'll make the next one a bit bigger.
Years ago at a college weaving class I described to the instructor that I would make an even-weave scarf with a tapestry section near each end. She discouraged me from that combination because the two structures are incompatible. Each structure needs a different sett for the same width of fabric. Tapestry needs more room between the warp threads to pack down all those weft threads. I compromised by doing an embroidered design on that scarf, but I never really gave up on the idea of combining the two structures in one piece.
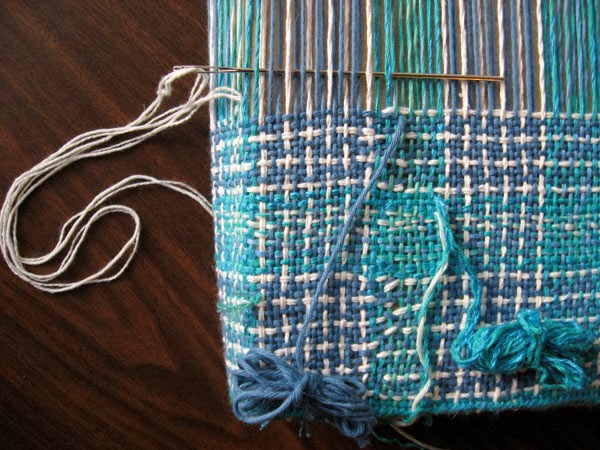
Now I have discovered a way to do it. I was using doubled crochet cotton as my warp and weft. What if I used just one strand of each warp thread in a tapestry section? That would make the sett appropriate for both structures. The first attempt was a square on the side of a tiny purse. I played with two-colour weave, alternating the colours every 8 picks to make a checkerboard pattern.
I now have another project ready to go. This one will have a tapestry stripe all the way around the purse. You can see the strip of milk jug plastic which I've inserted between the two strands of the warp threads for the tapestry section. I'll start and end the tapestry section with a row of soumak stitch over both strands of the warp threads. The plastic strip will be sandwiched in between the two strands of warp until I take the piece off the loom. Then I'll slit the tape that holds it together and slide it out. My coloured threads are all pre-cut and I'm looking forward to hours of weaving on a long plane journey!
Another set of colours asked to be used and the loom was still in good shape so I made a second little tapestry pouch. This time I kept the weaving method simple. I used two colours and alternated every pick creating a vertical stripe.
Usually when I weave in the round I need an odd number of warp threads, but I discovered that the most efficient way to weave this pattern in the round was to have an even number of warp threads and to weave one colour one direction and the other the opposite direction, crossing them at each colour change. So I used one pair of warp threads together for the pattern section. When I switched back to a single colour at the top, I went back to using all the threads individually.
 To keep from getting bored with such a simple weave, I graduated the colours within the stripes.
Lately I been doing Bible study in colour, following a few themes in Ephesians and painting and writing about what I've learned. I sketched how all these colours could go together in a wavy composition. Then I got inspired to try a tiny tapestry based on the sketch.

I collected a handful of the most brilliant coloured threads I could find (both fine tapestry wool and six strand embroidery cotton) and found crochet cotton for warp.
I used blue tack to fasten the graph paper pattern onto the flat parts of a plastic milk jug, and cut out two identical pieces with kitchen scissors. I cut zig-zags across the top, two per centimeter to hold the warp threads. With wide cello tape, I stuck the two pieces together to form a tube. I flattened the tube with the seams in the centre.
I slipped the tube over a chunk of cardboard and taped the bottom flat. I usually use just cardboard for my weaving form, but for this tapestry, I decided plastic might work better because it is strong and smooth to withstand the repeated beating with the fork and because its springiness causes it to form nice round ends for easier weaving.) I decided to weave free form and experiment with different kinds of shading and shaping.
I taped the crochet cotton to the cardboard to start winding the warp. I pushed pins into the bottom corners temporarily to keep the threads from sliding off the ends. I finished wrapping the warp at the bottom and used it to stitch across the bottom, anchoring and spacing the threads as I went.
Then I began to weave from the bottom, around and around. After a few rounds I was able to remove the pins. As I used up each thread I took it to the back and out through the woven part below. With the new thread, I left an end poking out through the weaving below and brought it in from the back and wove it in with the old thread for 8 or 10 threads.
All these loose ends will be pulled to the back of the weaving after the piece is removed from the form.
I packed the weaving tightly throughout and wove as close to the top as possible. When I took the weaving off the form, I pushed the weft upwards gently and evened out the weaving to cover the loops of white warp thread. I buttonhole-stitched green wool over the edges to hide the last little bits of white that showed around the top edge and at the bottom.
Soon I will stitch in a fabric lining as the last finishing touch.
Here it is!

I wove in the ends of the straps as 4 rows of weft around the top of the bag, starting at each corner and overlapping at the centre of each side and end. I worked a row of soumak stitch to hold the edge of the weaving and then began to weave from the bottom up, following the colour-and-weave pattern in my chart. I carried the different colours up the back of the weaving rather than start a new thread each time the colour changed.
I needed a portable longer-term weaving project for two months away from home. I wanted it without pins so that I could work on it during airplane travel. It needed to incorporate colour-and-weave and be woven all-in-one-piece. I dug through my yarn stash for a set of colours. Then I charted a favourite criss-cross colour-and-weave design.
A conveniently-sized handbag that I already had gave me the measurements. I built a hollow cardboard weaving form and left the pins in while I warped the bag (weaving the bottom as I warped the ends). Then I fastened the warp to the form by stitching through the cardboard and removing the pins as I went.
On the first airplane journey I plaited the two 18" straps. 18 strands used in pairs made a 9 strand braid of the weight I wanted. (Look at a previous post for a quick explanation of this technique). I bound the ends of the braid and left the ends long so I could work them into the top part of the bag.
The first idea for fastening in the straps involved weaving and soumak stitch but after I got one end done, I didn't like the way it looked. This will get unpicked and I'll try another method.
To be continued.